High-Level Overview of the Process
There are five stages to complete the entire recording and reporting (R&R) and data upload process. These stages are as follows:
- Download R&R Tool and Learner Data file
- Generate/Load R&R Tool
- Importing assessments marks
- Exporting data file from R&R Tool
- Upload data file via CEMIS
The high-level process is illustrated in the figure below. Each stage is explained in more detail in the subsequent sections.

Stage 1: Download R&R Tool and Learner Data File
This section describes how to download the R&R Tool and the associate learner data file for the particular grade from CEMIS.
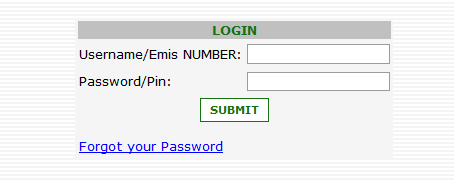
- Log on to CEMIS
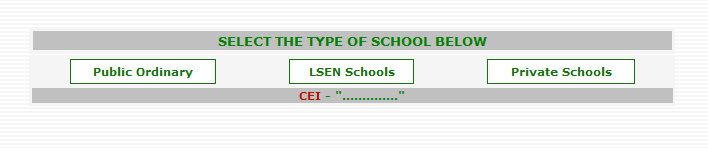
- Select the School Type
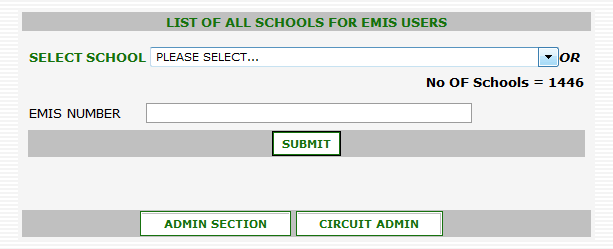
- Select the School and click on the “Submit” button
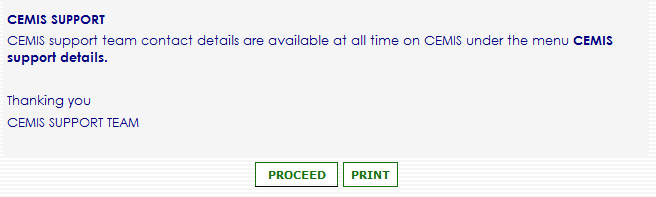
- Scroll down and click on the “Proceed” button
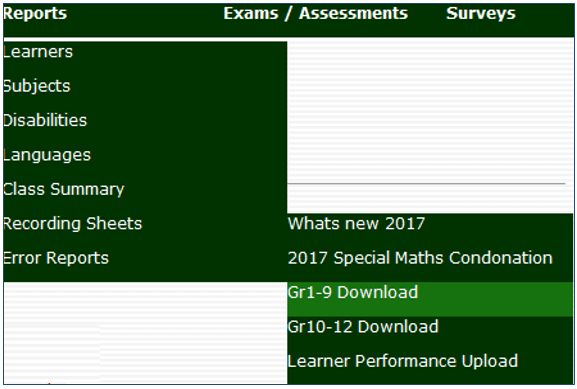
- Select the “Recording Sheets” option from the “Reports” menu bar option, then select the “Gr1-9 Download” option from the “Recording Sheets” option
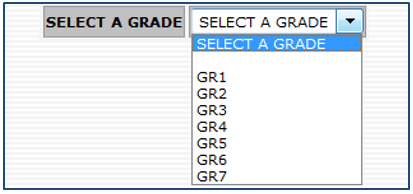
- Select the applicable grade from the “Select a Grade” dropdown menu
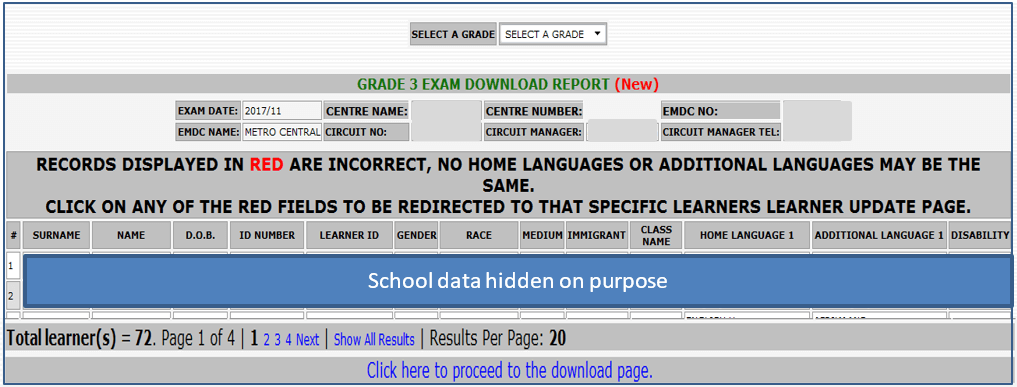
- A page will be shown displaying the learner data. Scroll to the bottom of the page and click on the “Click here to proceed to the download page” hyperlink
- Detailed instructions are provided on the Download Page. The summarised steps follows:
- Print the instructions if required
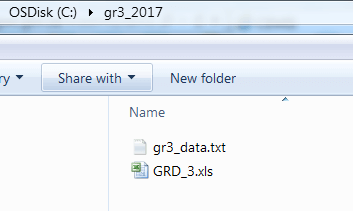
- Create a folder to store the Excel Spreadsheet (R&R Tool)
- Download the Excel Spreadsheet (R&R Tool)
- Download the learner data file
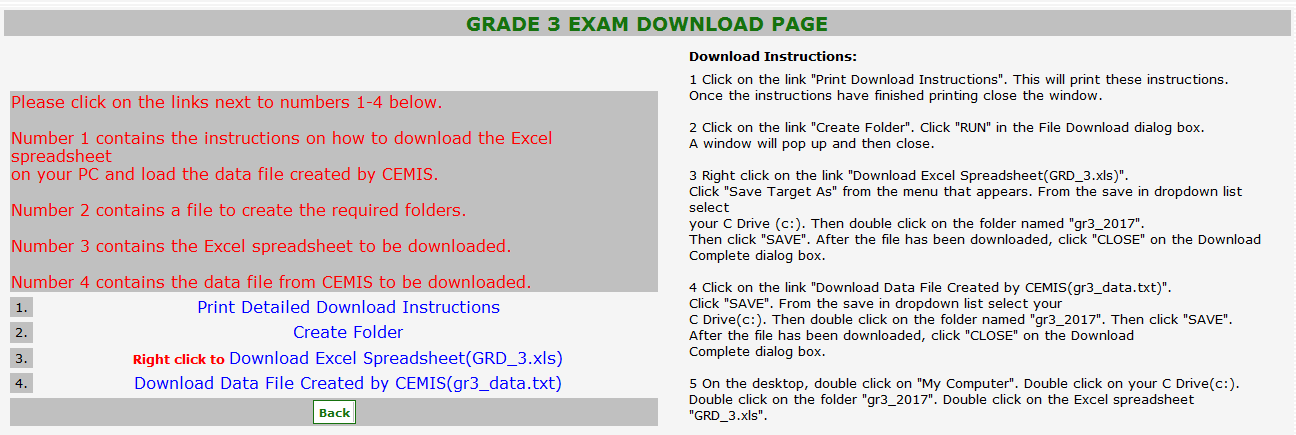
- Ensure that the R&R Tool downloaded and data file downloaded are saved in the same folder created in the steps above.
- Log out of CEMIS
Stage 2: Activate R&R Tool and Load Learner Data
- This section describes how to activate the R&R Tool and load the learner data file obtained from CEMIS into the R&R Tool.
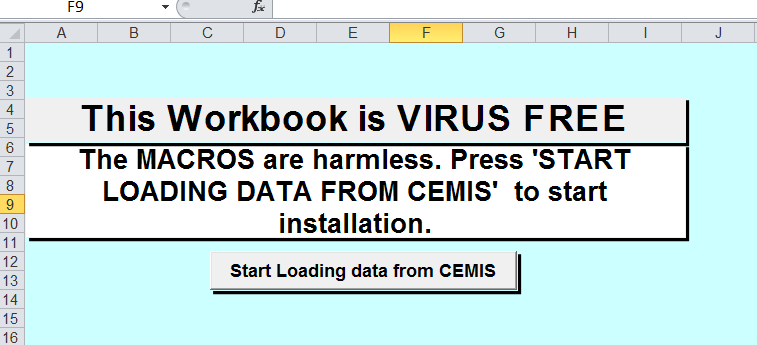
- Double-click on the Excel file to open the R&R Tool (named “GRD_3.xls” or similar).
- The R&R Tool will open and display the following screen
- Click on the “Start Loading data from CEMIS” button to load the learner data file. Note that this may take while.
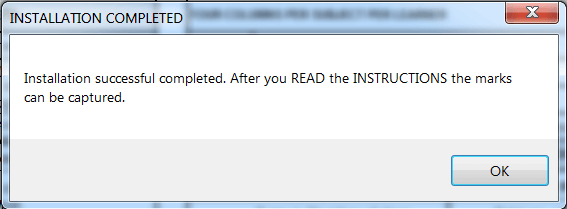
- The following message will be displayed on successful completion of the learner file load.
- Click on the “OK” button
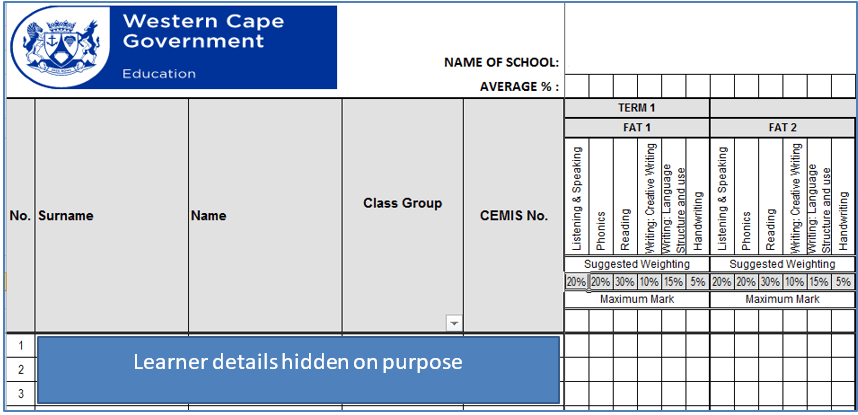
- Inspect the subject sheets. Learner details will be displayed for each subject. Note that there will not be any marks at this stage.
Stage 3: Import Assessment Data
This section describes how to import data from an R&R Tool (Excel Spreadsheet) that contains previously captured data.
[Describe multiple imports – different class files to be combined in a grade file]
[Include addendum for importing errors – “go to” section]
Prerequisite:
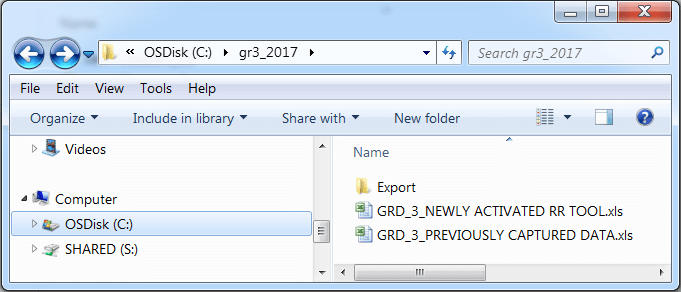
Ensure that the R&R Tool containing the data is in the same folder as the newly activated R&R Tool
- Open the newly activated R&R Tool and navigate to the “Personal Info” worksheet
- On the “Personal Info” worksheet, click on the “Import marks” button

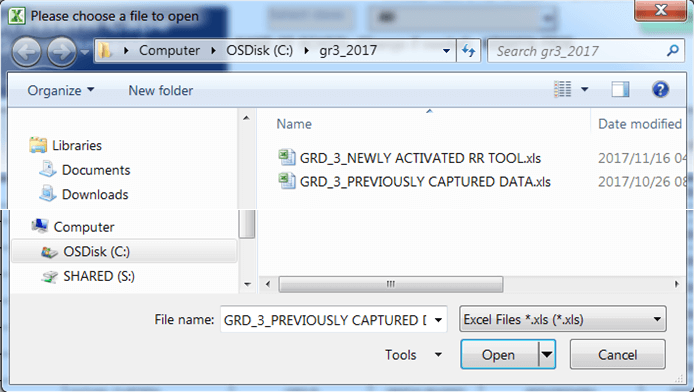
- Navigate to where the R&R Tool that contains the data have been saved is (here called the “GRD_3_PREVIOUSLY CAPTURED DATA”).
- Select the file and click on the “Open”
Do not describe errors in the narrative. Rather in the appendix section]
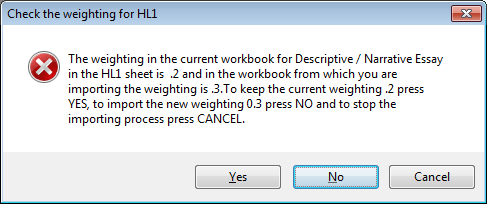
- If there are discrepancies between the weighting of the selected file and the R&R Tool to which the data is being imported to, a warning screen will pop up. Select the applicable action.
- If there are further discrepancies between weighting found the following warning screen will pop up. Select the appropriate action.
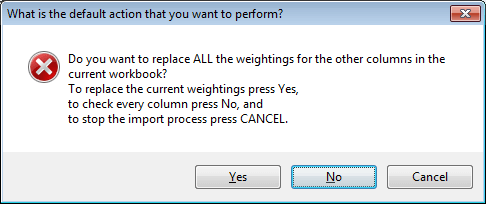
- NOTE: The program also checks for other discrepancies. In all instances a warning message will pop up. Choose the appropriate action (as per above examples).
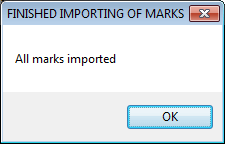
- Once all the marks have been imported the program will display an “All marks imported” message box.
- Click on the “OK” button
- The newly activated R&R Tool will import the data from the selected file.
- A message box will be displayed to inform the user that the marks have been imported.
- Click on the “OK” button to close the message box
- Inspect the subject sheets. The data should now show in the R&R Tool into which the data have been imported.
- The R&R Tool may now be saved. (Note that it is good practice to save regularly throughout the process.)
Stage 4: Export Data
This section explains how to export the data from the R&R Tool.
Need Information or Confused about Something ?
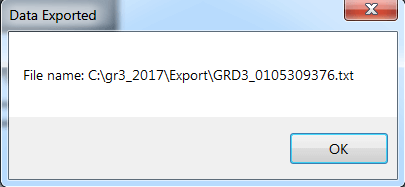
Ask a Question- Go to the “Personal Info” worksheet and click on the “Export” button

- Once the file has been exported a “Data Exported” message box will be displayed.
- Click on the “OK” button to close the message box.
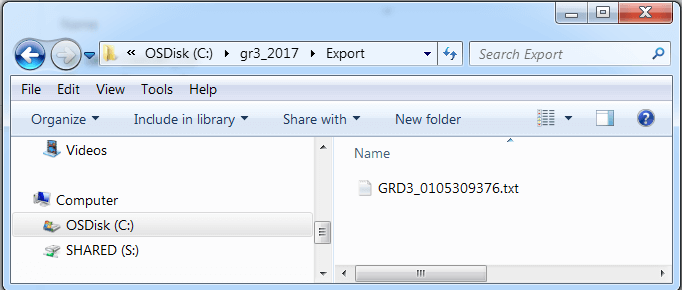
- Note that the exported file will be saved in the “Export” subfolder created automatically by the R&R Tool. See below.
- WARNING: Do not change the filename before uploading. The exported filename is the exact format that is required for upload to CEMIS.
- Click on the export folder to inspect that file have been saved
Stage 5: Upload Data
- Log on to CEMIS as per normal process
- Select the “Recording Sheets” option from the “Reports” menu bar option, then select the “Learner Performance Upload” option from the “Recording Sheets” option
- Take out the Gr10-12 part of the CEMIS screenshots x2

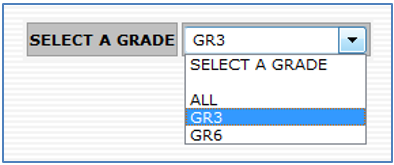
- The grade selection screen will be displayed. Choose a grade from the “Select a Grade” dropdown menu. (Note that only Grade 3, 6 and 9 will be active currently.)
- Click on “Browse…” button to upload the exported text file.
- Check if this is the correct screenshot
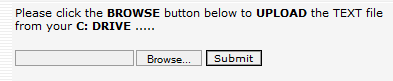
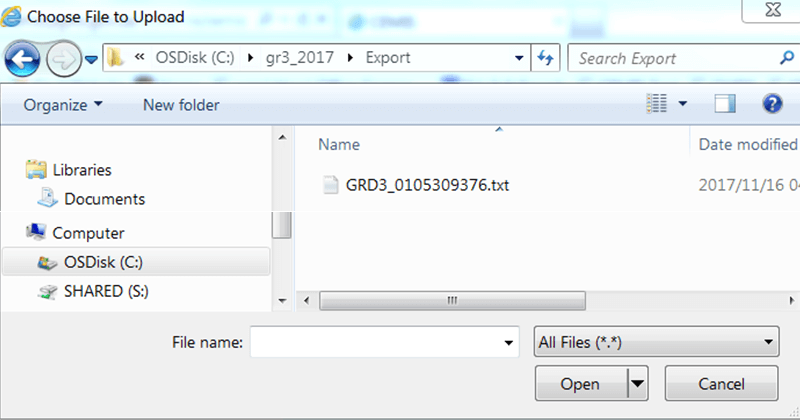
- Navigate to where the file to be uploaded is stored (in “Export” sub-folder).
- Select the file you want to upload and click on the “Open” button to upload the file.
- Click on the “Submit” button to complete the upload process

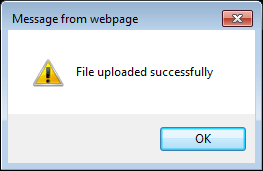
- The system will display a “File uploaded successfully” message
- Click on the “OK” button to close the message box.
- Message box may change. Check again before final version of doc.
- The system will display a “File loaded into Staging Area”.
- [WARNING: If the user changed the filename to an incorrect format an “Invalid filename convention”error message will be displayed. Ensure that the filename is correct and upload the file again.]
- Click on the “OK” button to close the message box.

- This ends the file upload process
Sponsored Guide
Complete Guide to NSFAS Online Loan Application for South African Students (2025)
If you are a South African student looking to pursue higher education but are facing financial difficulties, the National Student Financial Aid Scheme (NSFAS) is one of the most accessible funding options available. NSFAS provides financial aid in the form of bursaries and loans to qualifying students at public universities and TVET colleges in South Africa.
This guide will walk you through everything you need to know about the NSFAS loan application process, from eligibility requirements to application steps and frequently asked questions.
📌 What is NSFAS?
The National Student Financial Aid Scheme (NSFAS) is a government-funded financial aid scheme aimed at helping students from low- and middle-income households to access tertiary education without the burden of upfront fees.
NSFAS offers both bursaries and income-contingent loans:
- Bursaries: For eligible students who meet academic and household income criteria (especially for TVET and university students).
- Loans: For students who do not meet all bursary criteria or who are pursuing postgraduate qualifications not funded under bursary schemes.
✅ Who Qualifies for an NSFAS Loan?
To qualify for an NSFAS loan (especially for postgraduate students or programs not funded under the bursary system), you must:
- Be a South African citizen.
- Be financially needy, with a household income of less than R350,000 per year.
- Have a valid South African ID.
- Be enrolled or accepted to study at a public university or TVET college.
- Not be funded through another bursary program that covers all expenses.
- Maintain satisfactory academic progress (returning students).
📚 Courses Funded by NSFAS
NSFAS primarily funds undergraduate qualifications, but certain postgraduate programs (e.g., PGCE, postgraduate diplomas in education, and professional courses like LLB) may be considered under the NSFAS loan scheme, not bursaries.
If you’re studying:
- Undergraduate degree or diploma: You are likely eligible for a full NSFAS bursary.
- Postgraduate study: You may qualify for a loan, depending on the course and funding availability.
📄 Required Documents for NSFAS Application
When applying, make sure you have the following documents scanned and ready:
- Certified copy of your South African ID or Smart Card.
- Parent(s) or guardian(s) ID documents.
- Proof of income (latest payslips, UIF, or affidavit if unemployed).
- Consent Form signed by your parent(s)/guardian(s) to allow NSFAS to verify income.
- Proof of registration or acceptance at a public institution.
- Academic transcripts (for continuing or postgraduate students).
🖥️ How to Apply for an NSFAS Loan Online
Step-by-Step NSFAS Online Application Process (2025)
-
Visit the NSFAS Website
Go to: https://www.nsfas.org.za
-
Create an Account
- Click on “MyNSFAS” and register your profile.
- You’ll need a valid email address and South African cellphone number.
- Choose a strong password and verify your account via email or SMS.
-
Login and Start the Application
- After registration, log in to your MyNSFAS account.
- Click on “Apply” to begin a new application.
-
Fill in Your Personal Details
- Input your ID number, name, surname, and other details exactly as they appear on your ID.
- Provide household income information and living arrangements.
-
Upload Required Documents
- Upload all supporting documents in PDF or JPEG format.
- Each document must be clear and under the size limit specified.
-
Submit Your Application
- Review your application for accuracy.
- Click “Submit” and wait for a confirmation message.
-
Track Your Application
- Log in regularly to check your application status.
- You will be notified via SMS and email at each stage of the process.
🗓️ Important NSFAS Dates (2025)
- Application Opening Date: September 1, 2025
- Application Deadline: January 31, 2026
- Appeals Period: February 2026 (if rejected)
- Disbursement: After registration and approval
Note: Dates are subject to change; always confirm on the official NSFAS website.
💸 What Does the NSFAS Loan Cover?
NSFAS funding typically includes:
- Tuition fees
- Registration fees
- Accommodation (if living away from home)
- Meals and transport
- Learning materials (e.g., textbooks)
For loans, repayment is only required once you start working and earn above a threshold (around R30,000 annually, but subject to change).
🔄 NSFAS Loan Repayment
Repayments are:
- Income-contingent – you only repay when you can afford to.
- Administered by DHET (Department of Higher Education and Training).
- Interest-bearing, but interest rates are low and favorable.
You can also apply for a partial loan conversion to a bursary if you perform well academically.
🔁 How to Appeal a Rejected NSFAS Application
If your application is rejected, you may submit an appeal via your MyNSFAS portal:
- Log into your MyNSFAS account.
- Click on “Track Funding Progress”.
- If rejected, click on “Submit Appeal”.
- Upload any missing or corrected documents.
- Provide a clear explanation or motivation.
📱 NSFAS Contact Information
- Website: https://www.nsfas.org.za
- Email: info@nsfas.org.za
- Toll-Free Number: 08000 67327 (Monday–Friday, 8 AM–5 PM)
- Twitter: @myNSFAS
- Facebook: NSFAS
📝 Final Tips Before Applying
- Apply early to avoid system overload near the deadline.
- Use your own email and cellphone number (do not use someone else’s).
- Double-check that all your documents are certified and legible.
- Keep a copy of your submission confirmation for reference.
By following this guide, you can confidently apply for NSFAS funding and move one step closer to achieving your academic and career dreams—without the burden of immediate financial pressure.